


|
ALL ABOUT PUSHROD LENGTH
|
Quick Links:
|
Do I need to pay attention to pushrod length?
If your motor is all stock, the answer is no. Your stock pushrods are designed to be within the acceptable length range even in the worst case tolerance stack-up situation.
But when we hot-rod these motors, it's very common to make changes that individually or cumulatively can change the needed pushrod length:
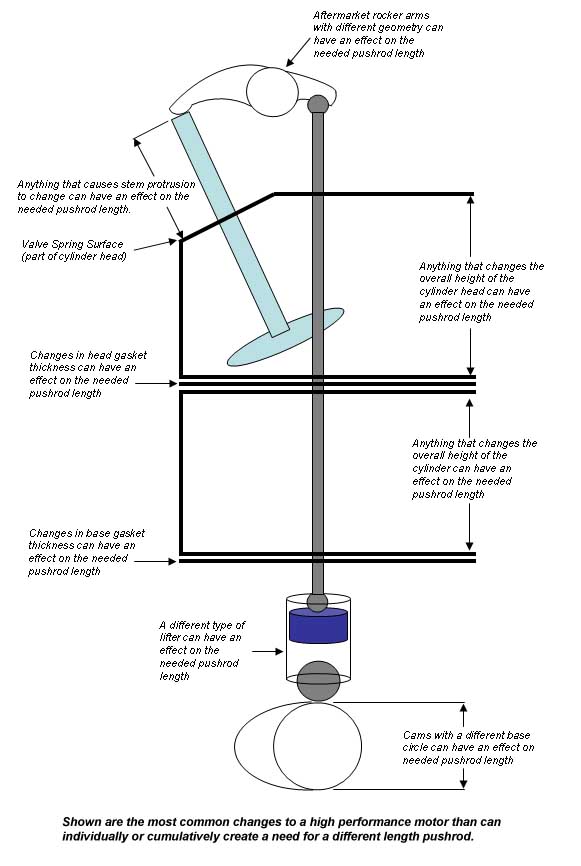
- Changing the height of the cylinder head changes height of the rocker arm relative to the cam, and therefore it needs to be factored into the needed pushrod length.
In particular, it's very common to "deck" a head to raise compression in a high performance motor. But in addition to that, some HD heads are taller or shorter than others,
so when swapping parts you also need to be aware of changes to the overall height of the head.
- Using thinner than stock gaskets, and/or omitting the base gasket, to increase compression or improve squish clearance, is a very common practice in high performance motors. Since this
raises or lowers the rocker arm relative to the cam, it needs to be factored into the pushrod length.
- Anything that changes valve stem protrusion also affects the needed pushrod length. Common reasons for valve stem protrusion to change are performing a valve job or refacing valves, sinking
the valves in the heads to gain valve-to-valve and/or valve-to-piston clearance, and using longer than stock valves to correct geometry or gain travel with very high lift cams.
- Changing to aftermarket rocker arms with different geometry can change the needed pushrod length in either direction
- Using camshafts with a different base circle can create the need for different length pushrods to compensate. Smaller than stock base circles are common in high lift cams as a way to alleviate
cam box and tappet pin clearance issue.
- Using longer cylinders, which is common practice when using longer strokes and/or longer than stock connecting rods, can create the need for longer pushrods.
- Using aftermarket "solid" lifters that are not self-adjusting creates the need for a very precise pushrod length to achieve proper valve lash.
- Using aftermarket travel-limited lifters, or travel limiting washers in stock lifters, creates the need for a very precise pushrod length to achieve the proper lifter plunger preload.
So as you can see, there are a whole bunch of common practices that can change your needed pushrod length. If you've done any of these things, pushrod length is something you need to pay attention to.
Pushrods that are too short for the application will cause excessive valvetrain noise and wear. Pushrods that are too long for the application can not only cause noise and wear, but they can cause engine
damage as well. So this is important to pay attention to. Read on for information on how best evaluate and adjust pushrod length.
|
How do I evaluate and adjust pushrod length?
The answer to this question depends heavily on what type of lifters you're using. HD's are delivered from the factory with what's known as self-adjusting hydraulic lifters. This means
the pushrod length does not have to be all that precise. Within a certain range, the lifter (aka tappet) will automatically adjust it's length longer if the pushrod is too short, or shorter if
the pushrod is too long.
But for better valvetrain control, hot-rodders often swap out the self adjusting hydraulic lifters for what's known as a "solid" lifter. The solid lifter is exactly what the name implies,
a solid piece of steel. There's no self-adjusting capability about it.
What's more, a third type of lifter that's a cross between the two is also very popular. This type of lifter, sold by JIMS under the name "Hydrosolid", is essentially a hydraulic lifter with
a limited adjustment range that's designed to operate with it's plunger nearly bottomed. Stock hydraulic lifters are also sometimes converted to this type of travel limited hydraulic lifter
by placing a travel limiting washer inside the body, under the plunger. This type of lifter places it's own set of requirements on pushrod length.
HAMMER PERFORMANCE offers all three types of lifters available for Harley Davidson engines.
Since the self-adjusting hydraulic lifter is by far the most common, we'll cover it first.
|
Pushrod Length with Standard Hydraulic Lifters
The most common method for getting the pushrod length right after any of the aforementioned changes is to use adjustable pushrods. In fact, it's so common that you'll see
some performance parts labeled "Adjustable Pushrods Required".
This is one of my pet peeves, because it's nonsense. The pushrod simply transmits the force of the cam lobe & lifter up to the rocker arm and valve spring, and turns around and transmits the
 valve spring pressure back down on the other side of the lobe. None of the parts know or care if there's a adjuster somewhere on the pushrod to change it's length with. Makers of performance
parts are simply telling you adjustable pushrods are "required" because that's probably the easiest way to get the pushrod length right. It's certainly not the only way, though.
Furthermore, it's not even the best way. At a given weight level, an adjustable pushrod is not as strong or reliable as a non-adjustable. I've seen the locknuts crack, I've seen the locknuts loosen,
I've seen the threads strip, and I've seen the adjusters themselves come apart. On top of that, adjustable pushrods cost more than non-adjustables, and they require a pricey collapsible pushrod tube kit
(if the bike didn't come from the factory already equipped) to facilitate adjustment. More connections in the pushrod tubes creates more opportunity for leaks, too.
Now sure, there are situations where adjustable pushrods are required. When you need to set your lash or your lifter plunger preload precisely, as is done for solid lifters or travel limited hydraulic lifters,
an adjustable pushrod is the only reasonable way to accomplish it.
But with a standard self-adjusting hydraulic lifter, there's really no necessity to an adjustable setup, and I don't care whose cams or rocker arms you're using. If you want to do it the simplest way possible,
sure, knock yourself out and buy an adjustable setup. But if you want to save a little money and have a setup that's lighter, stronger, and more reliable, take the time and trouble to determine the right pushrod length,
and buy pushrods of the correct length. HAMMER PERFORMANCE stocks the highest quality heat treated chrome moly pushrods in stock or shorter than stock lengths, and can quickly provide any other length you want.
So how do you go about determining and setting the correct length? There are 3 good ways to do it. But before we get into that, it's helpful to understand how the valvetrain works. A self adjusting hydraulic lifter
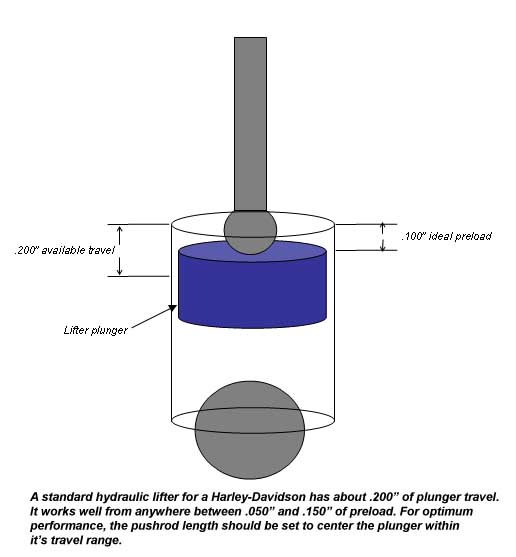 has a plunger in it's body that has about .200" of movement. Oil sits under the plunger and pushes it up to take the slack out of the valvetrain. In the ideal world, the plunger is approximately centered in it's
travel, meaning it's preloaded about .100". Therefore, in theory it could move up, thus lengthening the effective length of the lifter to compensate for a pushrod that's up to .100" too short, and likewise, it could
move down, thus shortening the effective length of the lifter to compensate for a pushrod that's up to .100" too long. This self adjusting action is also useful for compensating for changes in needed pushrod length
due to engine temp variations; as the motor heats up, the top end "grows" and the lifter automatically takes up the slack. In reality, though, the useful operating range of the lifter plunger is only about .050"
in either direction away from centered, or in other words from .050" to .150" of preload. Outside of this range, the self adjusting function doesn't work nearly as well.
With an adjustable pushrod, achieving the ideal .100" of lifter plunger preload is very straightforward. The basic procedure is to install them as normal with the engine at or near compression TDC, install the rocker box,
and then extend the pushrod length using the adjuster to preload the lifter plunger .100". This will normally be either 3 or 4 turns longer from the point where all of the slack is taken up, depending on the
thread pitch of the pushrod adjusters (3 turns for Sledge Hammer adjustable pushrods). Presto, your lifter plungers are preloaded the correct amount.
But if you want the benefits and cost savings that come with non-adjustable pushrods, it's not quite so simple. You have to determine what pushrod length your motor needs. There are at least 3 methods to do this:
Method #1: Add up all the changes. This is the simplest and most frequently used way to determine your needed pushrod length. Say for example that you started with a stock motor, decked your heads
.020", your valve job added .020" of stem protrusion, and you used a head gasket that's .020" shorter than stock. What should your pushrod length be?
In this case, we can simply add the .020" of head decking to the .020" of thinner gaskets, to get .040" total we lowered the rocker arms. The stem protrusion change is a little trickier, though. You can see
in the drawing that a taller stem protrusion will rotate the rocker back and require a shorter pushrod, but how much? The answer is a function of the rocker arm ratio, which is 1.625 for stock HD rocker arms.
Simply divide the .020" of additional stem protrusion by the 1.625 rocker ratio, which gives you .012". Add this to the .040" sum of the head decking and thinner gaskets to get .052".
What this simple calculation tells you is that if you get pushrods that are .052" shorter than stock, your lifter plunger preload will come out the same as it was before the changes. For most applications,
that will work just fine, and in fact HAMMER PERFORMANCE stocks pushrods that are .050" shorter than stock that would work just dandy. It does not, however, tell you what the preload would actually be. For that
information, we have to move on to:
Method #2: Measure at the rocker box how much the lifter will get preloaded. Here's another very simple way to get a pretty good idea of your lifter plunger preload.
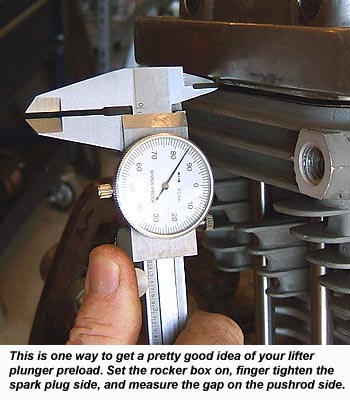 Simply put your pushrods in place (remember, the longer one goes on the exhaust), set the gasket and rocker box on top, and start the four big screws only. Finger tighten the left (spark plug) side, while making
sure the right side is resting with the upper pushrod ends sitting in the cups on the rocker arms.
Now take a simple caliper and measure how much gap you have between the rocker box and the rocker box gasket, as shown in the photo. This won't be an exact answer, but it'll be pretty close. Remember,
you'd like to see the plunger preloaded about .100, but anywhere between .050" and .150" should work. Order pushrod lengths that are longer or shorter than your stock pushrods by the amount it takes to achieve
.100" of lifter plunger preload. If you don't have a caliper to measure your stock pushrod lengths, the information is available in most factory service manuals.
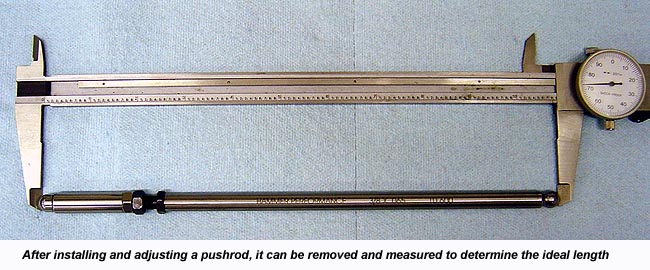
Method #3: Use adjustable pushrods to make the measurement. This is the most accurate of the three methods, but it also requires that you own at least two adjustable pushrods as well as a 12 inch
caliper. Simply adjust the pushrods to their full collapsed lengths and install as normal, sans pushrod tubes. Tighten down the rocker box and then adjust the pushrods by finger only until all of the slack is taken
up. Make sure of course that you do this with the engine properly positioned at or near TDC on compression (not overlap TDC!), and that the upper end of each pushrod is sitting in the pocket on the rocker arm. No need to tighten the lock nuts.
Now remove the rocker box, remove the pushrods, and measure the pushrod lengths with a caliper. Order non-adjustable pushrods of this length plus an additional .100" to preload the lifter plunger.
This method also has the advantage of giving you an exact number for each pushrod. You can literally order 4 different pushrod lengths and know that each is a precise fit for it's location, giving
the desired amount of lifter plunger preload.
|
Pushrod Length with Solid Lifters
Solid lifters are popular among racers for the simple reason that they offer the best valvetrain control at high rpm, without concern for lifter fill or bleed rates or pump-up effects. The downside
to a solid lifter however is that valve lash, or running clearance must be precisely adjusted and frequently readjusted. This essentially requires an adjustable valvetrain, and for a Harley that
essentially means an adjustable pushrod.
So why couldn't a person determine the ideal pushrod length using a method such as #3 above, where an adjustable was used to determine the length and a non-adjustable of that length was then put
 into the motor? Well, for one thing, the rocker box on a Harley has no alignment method, and every time you install one it ends up in a slightly different place. So your ideal pushrod length isn't going
to be the same each time you put it together, at least not to the precision level you need. For another thing, the ideal pushrod length changes with wear on the valvetrain components as well as on the
valves and seats. A little bit of recession at the valve/seat interface will tighten the lash up. This is why frequent readjustments are needed when using solid lifters. So unless you want to be swapping
the pushrods every time the motor is due for a valve lash adjustment, adjustable pushrods are mandatory. In reality, it's the only reasonable way to do it.
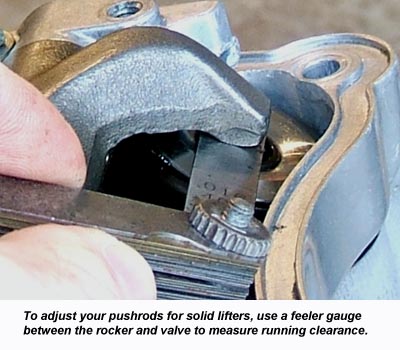
Valve lash is set using a feeler gauge placed between the valve tip and the rocker arm tip. The pushrod is then adjusted to give the desired running clearance. The exact clearance to shoot for is
a function of a number of different things, most notably the engine temperature, the cylinder construction (aluminum grows with heat at almost twice the rate of cast iron), and pushrod construction (again,
aluminum grows much more than steel). A hot running clearance of somewhere between .015" and .026" is pretty common, although you'll find with racers that everyone tends to have their own idea of the
ideal setting, and their own reasons for it.
|
Pushrod Length with Travel Limited Hydraulic Lifters
A third type of lifter is a cross between the hydraulic and solid lifter, known as a travel limited hydraulic lifter. This type of lifter has a reduced lifter plunger travel range, and is designed
to operate with the plunger very close to bottomed within that range. Aftermarket offerings of this type of lifter also typically have a faster bleed down rate to reduce hydraulic pump-up action
at high rpm.
The idea with running the plunger very close to bottomed is to give solid-lifter type valvetrain control independent of a hydraulic system, and yet give the ability to extend in length to compensate
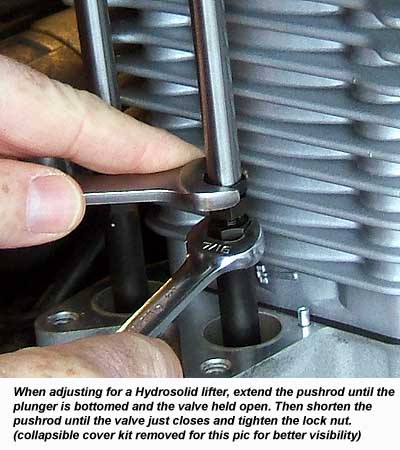 for a top end that grows with thermal expansion.
Since this type of lifter needs a very precise pushrod length to put the lifter plunger very close to bottomed, a fully adjustable pushrod is required.
To adjust this type of lifter, start with the motor at or near compression TDC as normal. Extend the pushrod until the plunger is fully bottomed and the valve is held open. Let it sit in this state for
a few minutes to ensure the lifter is fully bled and the plunger is truly bottomed.
Now slowly shorten the pushrod until the valve just closes. As you're shortening the pushrod, you'll feel the adjuster suddenly go loose, this is your cue that the valve has landed on the seat.
Stop right here. As you tighten the lock nut, the adjuster will typically turn with the locknut for about a quarter of a turn, shortening the overall length in the process. This is what you want. When you're
done adjusting the pushrod, you should be able to turn it with your fingers with little effort.
|
More Things to Know
|
|
|
|

|
|
|


 valve spring pressure back down on the other side of the lobe. None of the parts know or care if there's a adjuster somewhere on the pushrod to change it's length with. Makers of performance
parts are simply telling you adjustable pushrods are "required" because that's probably the easiest way to get the pushrod length right. It's certainly not the only way, though.
 has a plunger in it's body that has about .200" of movement. Oil sits under the plunger and pushes it up to take the slack out of the valvetrain. In the ideal world, the plunger is approximately centered in it's
travel, meaning it's preloaded about .100". Therefore, in theory it could move up, thus lengthening the effective length of the lifter to compensate for a pushrod that's up to .100" too short, and likewise, it could
move down, thus shortening the effective length of the lifter to compensate for a pushrod that's up to .100" too long. This self adjusting action is also useful for compensating for changes in needed pushrod length
due to engine temp variations; as the motor heats up, the top end "grows" and the lifter automatically takes up the slack. In reality, though, the useful operating range of the lifter plunger is only about .050"
in either direction away from centered, or in other words from .050" to .150" of preload. Outside of this range, the self adjusting function doesn't work nearly as well.
 Simply put your pushrods in place (remember, the longer one goes on the exhaust), set the gasket and rocker box on top, and start the four big screws only. Finger tighten the left (spark plug) side, while making
sure the right side is resting with the upper pushrod ends sitting in the cups on the rocker arms.

 into the motor? Well, for one thing, the rocker box on a Harley has no alignment method, and every time you install one it ends up in a slightly different place. So your ideal pushrod length isn't going
to be the same each time you put it together, at least not to the precision level you need. For another thing, the ideal pushrod length changes with wear on the valvetrain components as well as on the
valves and seats. A little bit of recession at the valve/seat interface will tighten the lash up. This is why frequent readjustments are needed when using solid lifters. So unless you want to be swapping
the pushrods every time the motor is due for a valve lash adjustment, adjustable pushrods are mandatory. In reality, it's the only reasonable way to do it.
 for a top end that grows with thermal expansion.

